

How To Repair An Rv Window Shade
How to Restring an RV Day Dark Shade
Introduction
The strings or components of your RV Day/Night Shade may go damaged, which could effect in your need to restring your shade. Instead of replacing the shade you tin can follow these instructions to get your shade as good as new!
A Note on Safety
Kids can strangle in blind cords. To brand your blinds safer for kids, keep cords out of reach and secure cord and dewdrop concatenation loops. To learn more, please visit our kid prophylactic guide.
Tools Needed

Scissors
Phillips Screwdriver
Flat-caput Screwdriver
Tape Measure out
Rubber Bands
Parts Needed
Stride one – Once the shade is removed from its mounting position, compress the fabric folds together. Secure information technology with condom bands, and remove the cord retainers.
Step ii – Lay the shade on a flat surface.

Pace 3 – Remove the spiral and string from the string retainers.

Step iv – Remove all of the end caps, and set them aside.
- Exist sure to remove any string that may exist attached to the terminate caps on your shade.
Stride v – Remove any mounting screws attached to your shade.

Pace 6 – Remove the safety bands from the shade and slide the bottom rail off.

Step vii – Remove any cord guides or grommets from the elevation rail, and slide the rail off. Some shades may accept rivets connecting the track and the fabric. If needed, drill out the rivets so the rails tin be removed.
Step 8 – Cut and remove the strings off of the spring(s).

Step 9 – Pull all of the strings out of the shade and discard.
Step x – Measure the amount of cord you will need for your repair.

- 2 and a half times the width, plus the height, times the number of lift strings will requite you the total amount of string needed to restring your shade.
Footstep eleven – Cut all of the strings needed for your repair.

Pace 12 – In this sit-in, we will restring a blind that has two strings. Your blind may contain more.
- The diagrams for the dissimilar amount of strings for your RV shade can exist found at the bottom of this guide.
Step 13 – Slide the bottom fabric off of the middle rails.
Step fourteen – Attach a string to each side of the spring using a double knot.

Step 15 – Thread the folded terminate of the wire restring tool through the middle runway and the superlative textile.
Step 16 – Identify the string in the eye of the tool and pull information technology through.
- Repeat for the other string.
Step 17 – Cross the strings on the bottom part of the middle runway channel.
Pace eighteen – Slide the bottom material onto the lesser of the middle runway.

Step 19 – Thread the folded end of the wire restring tool through the bottom fabric.
Stride twenty – Place the string through the centre of the tool and pull through.
- Repeat for the other cord.
Footstep 21 – Cross the strings forth the lesser of the lesser fabric.

- Make sure the strings are seated in the heart channel.
Pace 22 – Carefully slide the bottom rail on.

- Brand sure the strings remain in the eye channel.
Pace 23 – Slide the superlative rail on.

- Make certain the strings and the leap remain in the heart channel.
Step 24 – Supercede the end caps on the top and middle rail.

Step 25 – Thread the string through the lesser track end caps, and replace the end caps.

Step 26 – Supervene upon any top rail guides for the mounting screws.
Step 27 – Thread the cord retainers.

Footstep 28 – Secure the shade with rubber bands, and remount information technology.
Pace 29 – Reattach the cord retainers to their mounting locations, but practice not tighten them all the mode.
Step thirty – Shorten the strings at the cord retainer. Get out one inch of slack.

Step 31 – Remove the rubber bands and guide the shade downwardly all of the style.

Stride 32 – Turn the left cord retainer counterclockwise until all of the slack is removed from the string.
- Tighten the screw later on turning the cord servant, and removing all the slack.
Step 33 – Turn the right string retainer clockwise until all of the slack is removed from the string.
- Tighten the screw after turning the cord retainer, and removing all the slack.
Stride 34 – Test the shade.
- If at that place'south too much slack, tighten the cord retainers alternatively a one-half inch turn each until the desired tension is reached.
- Do non over tighten. It volition cause the string to wear prematurely.
RV DAY/NIGHT SHADE DIAGRAMS
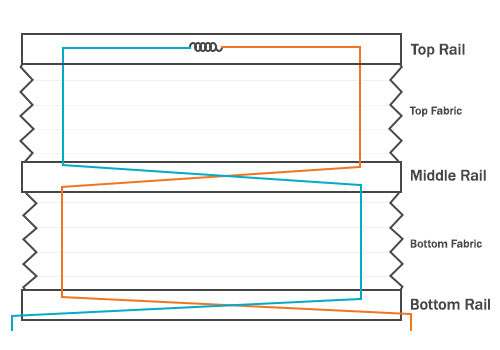
2 String RV Diagram:
This diagram shows the string path for a 2-string RV Day / Nighttime Shade.
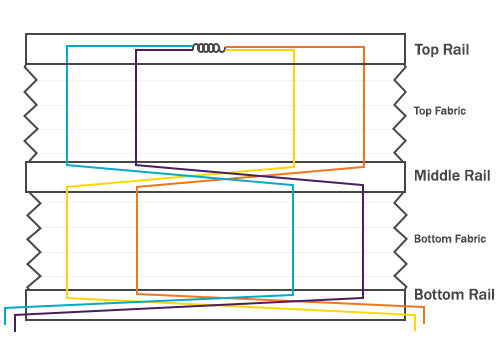
3 String RV Diagram:
This diagram shows the string path for a 3-cord RV Day / Night Shade.
4 Cord RV Diagram:
- The first diagram shows a 4-cord shade with one jump centered in the headrail.
- The 2nd diagram shows a 4-string shade with two springs centered in the headrail.
- The third diagram shows a 4-string shade with two springs at opposite ends in the headrail.
RV Night Shade Only Diagram:
This diagram shows the string path for a 2-cord RV Dark Shade.

How To Repair An Rv Window Shade,
Source: https://fixmyblinds.com/pages/how-to-restring-a-rv-day-night-shade
Posted by: newcombeins1999.blogspot.com
0 Response to "How To Repair An Rv Window Shade"
Post a Comment