

How To Repair Broken Sheetrock
Every bit a homeowner, information technology can sometimes be helpful to know how to repair drywall yourself. The principal reasons for this could be harm incurred while moving article of furniture, replacement of a window or door, cutting current drywall for a new light fixture, etc. And then at that place are more pressing needs such every bit water impairment from an adjacent room, window left open, or other less desirable reasons.
If you cull to practise drywall repair or replacement yourself, rest bodacious it is a simple and inexpensive project – for a small area (under 8 square feet) you will likely need only about $20 in supplies, plus whatever paint you lot choose to finish the job with. In this web log entry we'll talk near what you need and how to practise it. All you demand is a little time, patience and a little attending to detail.
Tools Needed:
- Utility knife with a fresh blade
- Articulation and taping knives (I prefer a half-dozen inch and a 12 inch for most jobs)
- Sand paper (120 to 150-grit or drywall newspaper is best)
- Rag or sponge
- Saw for removing damaged gypsum (this can be every bit basic as a "jab saw" or a power tool such as an oscillating multi-tool)
Supplies Needed
- Pre-Mixed Joint Compound (1.75 pt should cover almost 20 Square feet, or a 4×5 foot patch)
- Articulation record (I adopt Fibal type tape)
- Handi-Panel or sheetrock (gypsum) panel – You lot tin buy these as two×ii feet or standard 4×8 foot and cut every bit needed.
- Woods for anchoring or drywall repair clips
Preparation and Demolition
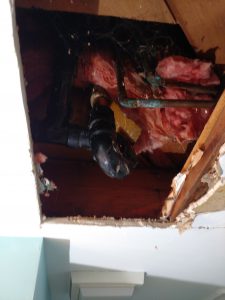
Earlier starting, it's a expert thought to close off the space you will be working on and remove or cover anything you don't desire to get dusty or dirty. Cover the flooring you will be working on with poly or a another covering such as a drop cloth or old sheet. In this example, the drywall being replaced is from a ceiling below a bath tub where the fixture was leaking behind the valve, and then some of the drywall that came down was clammy. Dust from sanding will as well be an issue if not properly managed.
- Determine the section to cut and marker it out using a direct border ruler or foursquare.
- Cut away the damaged section of drywall. I chose to do this with an oscillating multi-tool with a cutting head). Accept care to cut as cleanly equally possible, but don't overthink it; y'all can patch small errors with ease.
- Audit the area remaining – cut as necessary to remove any damaged parts (especially water damage)
- If your cut is close to a stud or nailer, only does not expose it, consider cutting a little further so you have a adept surface to fasten the new panel to.
- Measure the thickness or depth of the existing gypsum board every bit well as the size of your newly formed pigsty.
Gypsum comes in four thicknesses in most homes:
– 1/4″ – mostly used in curved applications, it is not common but may exist in some homes and is bachelor just hard to find at most stores.
– iii/8″ – more common in older homes and widely available at virtually domicile supply stores.
– 1/ii″ – This would be considered the most standard thickness and is widely available.
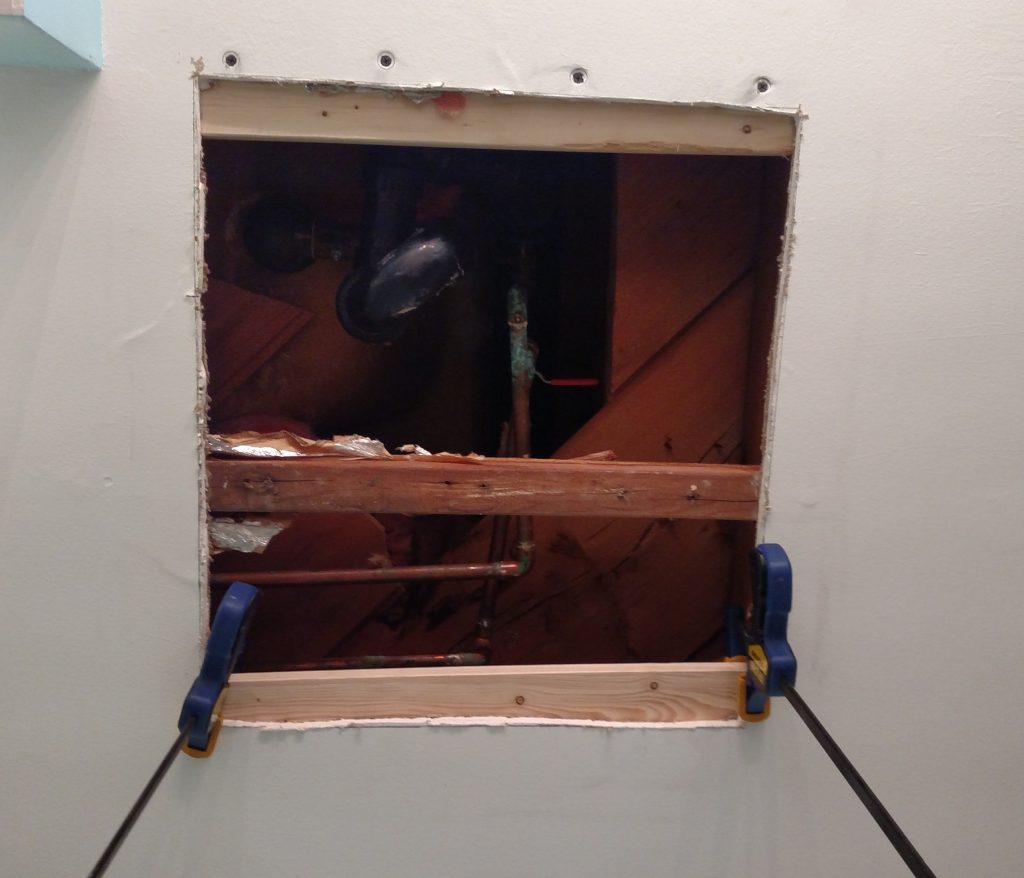
– 5/viii″ – Normally found in ceilings, and ofttimes of a fire resistant form. This is less likely to be found at a home supply store, and more likely in a drywall supply store. - Ensure that the hole either has exposed studs or nailers, or you tin can
- With the new panel in hand, take time to re-mensurate the opening you need to make full. Fitting the new piece is easiest if you cut straight lines, and a tighter fit volition be accomplished. A gap is okay, but try to go on whatsoever gaps less than 1/4″ (less is better). Mark your cuts before hand
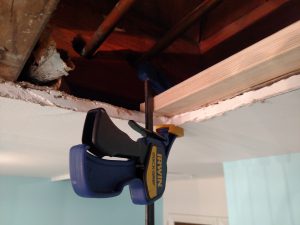
Using a piece of one×three or i×4″ pine, create atrip to attach the new gypsum panel to. - There are two means to braze the new console – Hither I have screwed a strip of wood on either side of the opening to secure the panel to; the other choice is to use Drywall repair clips – allowing you to anchor a screw into the existing drywall without a more substantial support.
- To cut the new panel, place a directly edge confronting your line and score information technology with a utility knife. With the flake edge hanging over a apartment surface just across your score, chop-chop snap the piece downward to break the gypsum. Flip over your panel and cutting the backing paper to remove the excess. Practice this for all sides to exist cut. (Pictures below)
- Check the fit and trim excess away with the utility knife or by shaving the surface with the knife perpendicular to the edge.

Mark your lines using a pencil or felt tip marker. 
Cut along your marks using a sharp utility knife 
When scoring, cutting the paper, but not to deep into the drywall as this volition tedious your bract 
Snap the piece downard along the score line and revers to cutting free of the paper backing. - Anchor the wood strips to attach the new panel if using.
Using wood strips, anchor with a drywall screw to the existing gypsum. - Attach the new panel with drywall screws (keep in mind that fewer screws will mean less patching with mud, but too few may non be secure. Aim for one screw on each corner, plus another every foot)

The new panel is secured and attached with screws; fibal tape is practical to the edges prior to the first coat of joint compound or mud. - Apply tape to the seam and brainstorm mudding your drywall. I cannot practice amend than to recommend this video as information technology truly is an art form.
Points to think when mudding joints
- Less is more – exercise non utilise besides much mud, or over work it.
- Aim for 2-3 coats ideally.
- Alloy joints by extending past by 6-eight inches.
- Clean your tools in between and ensure they are dry out.
- Employ a flashlight shined along the wall's surface to detect irregularities.
Finishing
When y'all are satisfied with your joints, utilize a glaze of primer or your first glaze of paint. At this time if you find any imperfections, dips or divots, you can still add together a small amount of joint compound and sand to correct earlier painting. Congratulations, you've completed your first drywall repair!

Source: https://creekrealtymn.com/homeowner-resources/repair-patch-drywall/
Posted by: newcombeins1999.blogspot.com
0 Response to "How To Repair Broken Sheetrock"
Post a Comment